
One of my favorite things to do in Illustrator is make flowers from geometric shapes. It's really fast and easy. 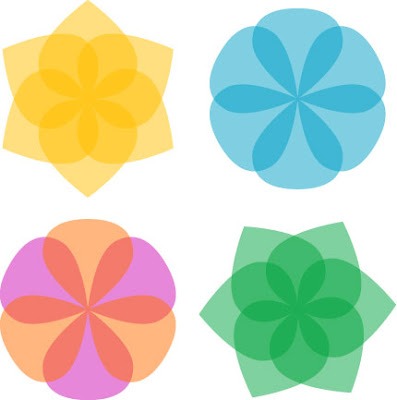 Here's a little background on how objects in Illustrator work. Illustrator works with vector images, meaning shapes are made with lines. Images can be made much larger without losing resolution. (In contrast, Photoshop is raster, meaning that the image is made of pixels and can't be made larger.)
 Here's a little background on how objects in Illustrator work. Illustrator works with vector images, meaning shapes are made with lines. Images can be made much larger without losing resolution. (In contrast, Photoshop is raster, meaning that the image is made of pixels and can't be made larger.)
  Anchor points are the dots that connect lines and determine the slope of the line. The degree of the slope is determined by lines called direction lines (see diagram above). You can view and alter the direction lines by selecting a point using the open arrow. If you've studied calculus, you'll see that the direction lines are the tangent line to the curve.
If you are learning Illustrator the best thing to do is experiment with the pen tool and all it's features. Learn how the direction lines work and how to change them. A good practice exercise is to place an image and then trace around it with the pen tool.
How to draw a flower in Illustrator
 Step 1
Draw a circle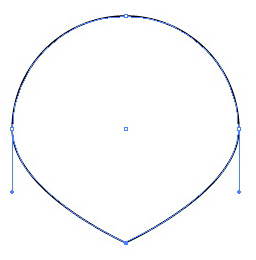 Step 2
With the Convert Anchor Point tool (Shift + C), click on one anchor point. This removes the curves created by the anchor point.
 Step 2
With the Convert Anchor Point tool (Shift + C), click on one anchor point. This removes the curves created by the anchor point.
 Step 3
With the Direct Selection Tool (open arrow) select the two side anchor points.
Using the arrow keys, move the anchor points up, away from the pointed end of the shape.
 Step 4
With the Rotate tool, option-click on the pointed end of the shape. This opens the rotate dialog box. For six petals, enter 60 degrees in the angle text box. Then click the Copy button.
 Step 5
You now have two petals. With the second petal still selected, perform the Transform again action by pressing Command + D on your keyboard four more times until you have a complete flower.

For a different look, rotate the petal using the opposite end as the origin of rotation.

Have fun and experiment with different shapes, colors, transparency, number of petals and rotation origin.
I hadn't used Illustrator for about... ooh, 10 years until I stumbled upon your blog just now and after having a good old read I found this post. I had to try this out. It was fun!! Thanks for the tutorial. You've inspired me to have another crack at using this program.
ReplyDeleteI've just made a heap of those flowers... pretty!
I like your tutorial so
ReplyDeleteI'm going to post a link and review to it on my blog...
:-)
Nice looking and simple to do, thanks!
ReplyDelete