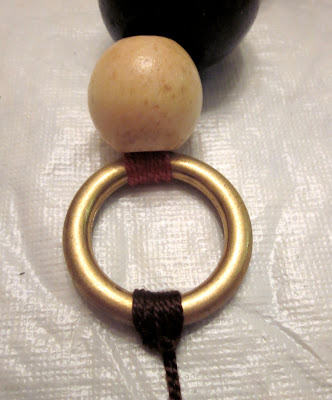
 I made this necklace over the weekend using some beads I impulse purchased a long time ago and some extra large jump rings I bought downtown 2 weeks ago. To string the beads and connect them to the rings I used pearl cotton, making decorative knots on the jump rings.
 Below are rough instructions for how I made the necklace. I made it up as I went along and I'm sure there are many ways to do this.
Beaded Ring Necklace Mini-Tutorial
Supplies:
Variety of wooden beads
4 X-large jump rings
pearl cotton in coordinating colors
small jump rings
2 bead covers
clasp
Variety of wooden beads
4 X-large jump rings
pearl cotton in coordinating colors
small jump rings
2 bead covers
clasp
 Step 1: Layout beads and jump rings in the design you want to make, with bigger beads at the bottom. This is the perfect time to determine the length you want to make your necklace.
 Step 2: Cover gap in jump ring with masking tape to keep thread from falling through. Cut a long piece of pearl cotton and tie the center of it on the jump ring. Thread the two loose ends on a large blunt end needle.
 Step 3: Make blanket stitches on the jump ring, alternating on the left then right side of the knot about 6 times. Finish by making a knot through the center of the large knots.
 Step 4: Thread beads. Make knots on second jump ring. Run thread through beads again and knot through the knots first created. Cut thread and hide the ends inside a bead.
 Step 5: Cut a second long length of thread and tie to jump ring. Make knots as before.
 Step 6: Thread beads, repeating for additional sections.
  Step 7: For the final section, thread a bead cap on the end. Make a knot, thread a jump ring and run thread back through beads. Knot and trim thread.
 Step 8: On one end make a small chain with jump rings and on the other add a clasp.
 All done! The project was really fun to do and fairly easy taking only an hour or two to complete.

0 comments:
Post a Comment
Thank you for visiting my blog! I love getting comments and always visit links when available.
Note: Only a member of this blog may post a comment.