

Showing posts with label fabric. Show all posts
Showing posts with label fabric. Show all posts
Thursday Thriftday – Vintage Fabric
Vintage Black and White Scrap Fabric

Just a little sharing today. These are fabric scraps that my great-aunt collected over her many years of sewing. She organized them by color in shallow boxes.

I love the grey fabric. Love it.

Last but not least some scrap muslin. Any ideas on what I should do with the fabric?
DIY Tutorial and Pattern – Fold-over Zippered Pouch with Wrist Strap
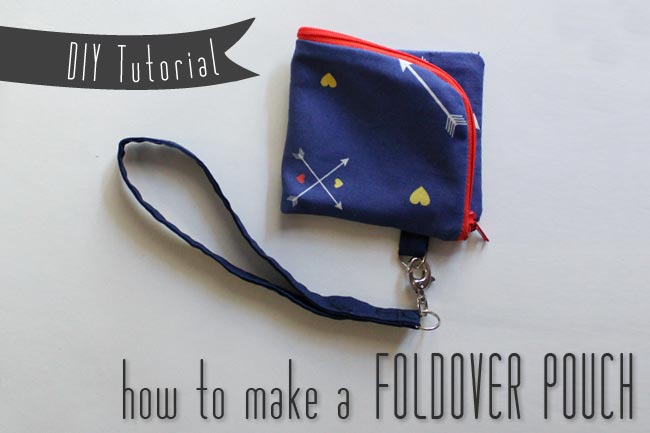
This fun little pouch is the perfect size to carry just the bare essentials. Or unfold it and you have a pencil pouch. Don't want to carry a purse? Just slip the wrist strap on and you're ready to run about town. The removable wrist strap allows you to move the pouch from your bag to wrist with ease.

Read the tutorial and download the pattern after the jump.
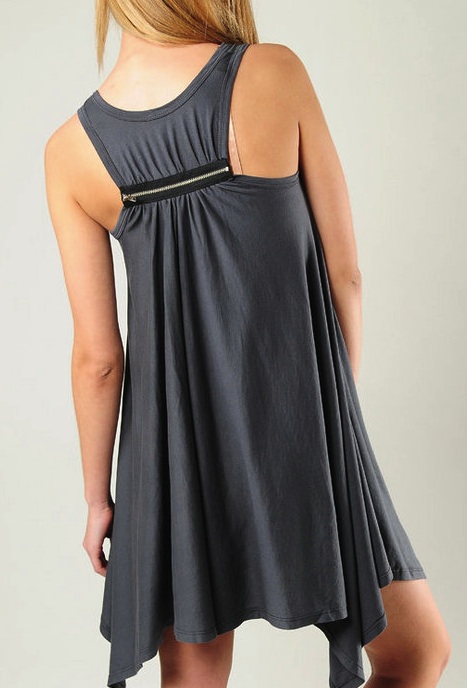
Refashion – Sporty Tank Top

This sporty little tank top started out as a loose, knit peasant top that fell off my shoulders on the rare occasion that I actually wore it. The yellow contrast fabric is the swatch from a fabric I have on Spoonflower. (If you'd like to get some of your own, you can actually purchase it here.) I used the basic tank pattern that I used for my Dip Hem Dress.

See more pics after the jump.
DIY Fabric Bow Tutorial

So after Saturday's bow-spiration moodboard, I'm sure you're itching to make yourself one or two or a thousand. Well, no need to fear, here is a quick and easy tutorial for making your own fabric bow. It might look like a lot of steps but it's really fast and easy. And, it only takes a little bit of fabric. I used scraps leftover from this refashion. Let's get started!


Step 8: Fold raw edge under and pin. Slip stitch the band in place.

Weekend Shopping - Fabric Remnants

Friday Faves – Gingham and Seersucker

1. Gingham Bows
2. Altuzarra for Jcrew Sabrina Dress
3. Green Check Blouse
4. Seersucker Wide Leg Pants
5. Gingham Swimsuit
6. Steven Alan Dress Spring 2011
7. Seersucker Keds
8. Checkered Tea Spoons
I am thrilled that my ombre clutch pattern has been featured in the Frankie Magazine newsletter this week. Thanks Frankie!
Ombre Clutch

A little preview of what I've been working on – a couple of ombre dyed fabric clutches.
Thursday Thriftday - April 19

Organizing Fabric Scraps

Check out these fabric storage and organization tips from around the web:
Undercover Crafter
Everything Etsy – Part One and Part Two
Sew We Quilt
Patchwork Duck
Operation: Sewing Room Organization Flickr Group
Cut to Pieces
Apartment Therapy
How do you store your fabric?

Fabric Organizing
 Frustrated with the bins in which I stored my fabric, I bought a six-drawer Antonius organizer at IKEA. The model was on a close out sale, perfect for my budget.
 After a lot of serious hammering, I was able to jam the frame together and slide in the baskets.
 My fabric was already folded so transferring went quickly, although the bundles are a little too tall.
 I'm very pleased with the drawers and was able to clean up the closet rather well.
Thursday Thriftday - Oct 14
Rose & Grey Floral Patterned Fabric
 Thrifted in Eugene, OR
I think this fabric would be beautiful as a fitted blouse with a rounded collar.
Adventures in Fabric Dyeing
 A few weeks ago, I impulsively bought a couple of yards of knit fabric from Michael Levine's bulk fabric store. It was a fun tie-dye combo of magenta purple, yellow, orange and green. I hand washed it in the sink and all of the purple dye washed out! Vinegar and salt did nothing to stop the bleed. I was left with the yellow and green fabric above – not something I would buy or wear.
 So, I decided it was time to try some dyeing. I bought some blue and navy Jaquard Acid Dyes and combined the two for a dark blue color. I wanted to maintain some of the original tie dye quality of the fabric so I twisted the fabric and bound it with rubber bands. I used the instructions provided online for the dye process.
 Again, during rinsing a lot of the dye washed out, despite using Synthrapol as a pre-wash and after-wash. I don't believe the dye was the problem, rather the fabric is very troublesome. As a comparison, I also dyed some other fabric (originally brown) which turned a solid dark blue.
 Still, I like the dyed fabric much more than the washed out yellow. Next step is some sewing. I'm planning to make a dress.
Some design inspiration:
Splendid Modal Zipper Back Dress


BDG Pleated Frock from Urban Outfitters


Or more likely, drape drape no.6

Splendid Modal Zipper Back Dress

BDG Pleated Frock from Urban Outfitters


Or more likely, drape drape no.6

Thrifted Fabric

 On my trip to Oregon at the end of July I picked up some fabric from my favorite thrift store. The two above are vintage double knits. Below is a cotton and two dressier fabrics. On this same shopping trip, I picked up the rainbow stripes.

 Any ideas on what I should make with these fabrics? The blue cotton is already a dress to be shared soon. I think the blue double knit would make a nice skirt. I'm not sure about the yellow stripes.
Rainbow Stripes
 I've loved rainbow stripes for years and years. I found the fabric above at a thrift store and snatched it up immediately. It's exactly like the fabric of a rainbow striped romper I had when I was about 6 years old. That romper was one of my favorite outfits. I don't remember the details of the garment but I do remember the fabric. I believe it was rather like the romper below. (I found these photos somewhere on the world wide web a while back; I think via The Coveted Vintage Pick of the Day.)


Or maybe a cute little dress like the one above from Thread Social's Spring 2009 collection. Besides the rainbow stripe, I especially like the scoop neckline and fluttery sleeves. Maybe there would be enough fabric for a tank top and shorts, to be worn separately or together if I start to get daring. hmm...
Thrifting Weekend Finds
 I found some great fabric and vintage patterns while thrift shopping this weekend. I even used some of it to whip up a new summer dress, to be posted when I get some decent photos taken.
Fabric Swatches
 Inspired by the fabric swatches on the PurlBee, among others, I started putting this decorating project together months ago. This weekend I decided to finally wrap it up.
  I already had a few vintage embroidery hoops but thought I needed more. I went to JoAnns but they only had brightly colored plastic ones. So, I headed over to Michaels and picked up a variety of wooded hoops. They were all priced for one dollar plus some change. They were cheaper than I had expected meaning I bought more than planned. However, I probably wouldn't use them for actual embroidery because I would be a concerned that the hoop would break with frequent use.
 To put these together, I just hooped the fabric and cut it close to the edge. Then hung the hoops on thumbtacks. I may need to do some more rearranging or add some more hoops to get the balance of the composition just right.
Subscribe to:
Posts (Atom)