Showing posts with label earth. Show all posts

Free Pattern Recycled Corduroy Blanket

This recycled corduroy blanket is one of my all time favorite projects and beyond a doubt the best blanket in the world. I know that might be hard for you to believe but that's only because you have not taken a nap or watched tv with this blanket. If you did, you'd know that it is the best blanket in the world.
I made this blanket about 6 years ago using wide wale corduroy (you remember that 90s fave fabric right?) that I rescued from the Goodwill pile. Wide wale corduroy has those soft, fat ridges of fluff. 
The blanket is made of alternating columns of corduroy squares and narrow rectangles with a backing of microfleece. The pattern is available for FREE on my website.

If I were to do it all over again (which I hope to one day in lovely neutral colors), I'd use a larger seam allowance and actually quilt (topstitch) the top of the blanket. I've had issues with the seam coming apart on this quilt but I just use a narrow zig-zag (buttonhole stitch) to tack the fabric down and all is right again.

Between the microfleece and the wide wale corduroy this blanket is so soft and has the perfect heft to it. And, very importantly it's long enough to fit over my feet and still cover my arms (about 70 inches long). That's maximum warmth and there's not much else you can ask for in a blanket. Seriously, best blanket ever.

DIY Camera Strap

Inspired by this camera strap tutorial on the Design Love Fest blog and my recent foray into fabric painting, I made this camera for my Holga 120N. The strap that came with the camera was a very thin black and red striped webbing.
To make my strap, I gathered some materials from my stash: 2 metal D-rings, webbing (ugly camouflage pattern that I am all too happy to cover up) and fabric. The materials came together perfectly for this project.The D-rings are perfectly sized to the webbing and the webbing was just long enough – 29.5 inches. The strip of fabric was from a failed skirt waistband and already interfaced.

I cut the fabric 2.5 inches wide by 31.5 inches long. I stitched it into a long tube using a .25 inch seam allowance and turned it right side out. I then slid the fabric over the webbing and painted on my design.
I folded in the raw edge of the fabric, slipped on a D-ring, and folded the fabric over it to the wrong side of the strap, added a bit of glue and held it all in place with a binder clip until it dried. To finish I stitched through all the layers using a heavy weight sewing needle. And all done! 
Looking for more inspiration? Check out these camera strap tutorials from around the web:
DIY Camera Strap from ModCloth
Scarf Camera Strap from Photojojo
Camera Strap Cover Tutorial from Inside NanaBread's Head
Camera Strap with Lens Cap Pocket from LBG Studio
Camera Strap Cover from Make Something

Free Tutorial Pattern - Ombre Clutch


 I've worked up a cute little clutch with some elegant ombre dyed fabric. Inspired by the current ombre trend and looking for a way to spruce up some drab muslin-ish fabric laying around, I decided get myself a-dyeing. But more on that later. Today, I'll show you the basics of making one of these clutches yourself.
 
This is a very easy project, just a pocket with a fold over flap. It is very similar to the D-ring clutch I made a while back. I'm thinking about trying one sized to fit my kindle too. (Mostly because I think I should be able to take my kindle with me everywhere.)

Ombre Clutch Tutorial / Pattern

Materials:
Ombre Fabric
Lining Fabric
Interfacing
Batting (optional)
Thread
1 Magnetic Button Closure
Gold fabric paint (optional)
Artists Tape (optional)

NOTE: Use a .5 inch seam allowance for all seams.

 
Step 1:
 Cut 1 piece sized 13 x 11.5 inches for flap (outside) and 1 piece sized 13 x 6.5 inches for pocket each of fabric, lining, interfacing and batting (if using). 

Note: This pattern can easily be adapted to any size you want. I'd start with determining the desired finished size of the clutch. Next decide how much overlap you want and add that to the height for the flap. And don't forget to add a .5 inch seam allowance.

Step 2:
 Adhere interfacing to fabric. Baste batting to fabric, if using.

 Step 3:
With right sides together, stitch lining pocket to lining flap along sides and bottom, starting .5 inch from edge of inside pocket (see below).

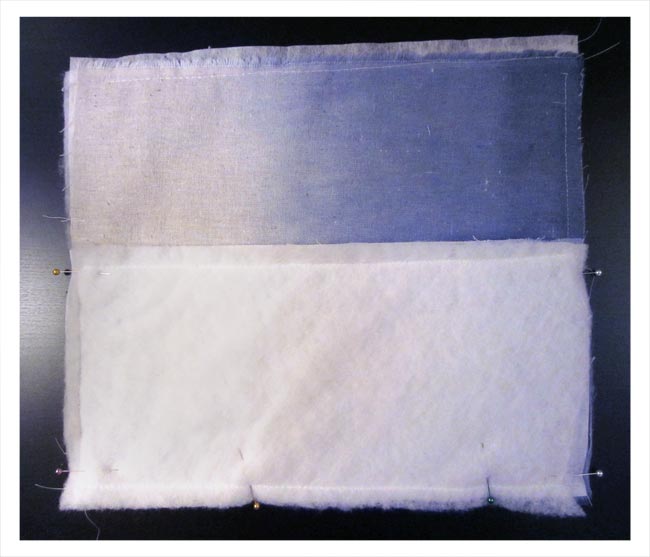


 Repeat for ombre fabric.
Step 4:
Trim the corners of the lining and ombre fabrics.

Step 5:
Next, stitch ombre fabric to lining fabric. Place lining fabric and ombre fabric right sides together, one bag inside of the other. Stitch top edge of front pocket lining to ombre fabric, leaving an opening for turning (see above).
Step 6:
Stitch sides of clutch flap lining to sides of ombre fabric flap, keeping seam allowance free (see below). Round corners of flap if desired.


 Step 7:
Turn clutch right side out through opening. Hand stitch or top stitch opening closed and attach magnetic closure.
And all done! This version is a subtle hand-dyed version made using batting. The batting provides a little extra (very soft) heft to the clutch but is not necessary. Using a heavy interfacing and heavy weight fabric also helps bulk up a project.
For this version, I pieced 3 pieces of fabric together for the flap and used gold fabric paint to create a geometric design. Piecing fabric strips together is a great way to use up smaller pieces of fabric that might otherwise find themselves in the dustbin.
If desired, you can also square off the bottom corner of the bag as shown above. This step is done before attaching the lining to the fashion fabric. I'll be posting more soon about fabric dyeing and fabric painting so please check back. I hope you like the tutorial. Please let me know if you make a clutch. I'd love to see it. Cheers! 

Friday Faves - April 20

Font: Silverfake, available for free from FontFabric

My Favorite Eco-Friendly Tips

1. DIY cleaning supplies
It's easy and affordable to mix up your own cleaning supplies. Using washable rags rather than disposable paper towels will increase the earth friendly factor. Check out some recipes here and here.

2. Use scrap paper to make notebooks
 See my tutorial here. Also, try reusing wrapping paper and ribbons. Check out these tips from Martha Stewart.

The production of new stuff requires a lot of energy, buying used or vintage items saves in more ways than one.

4. Use boxes to organize drawers
Rather than throwing away boxes, use them to organize drawers. If the box is too tall for the drawer, use an exacto to cut it down to size. Or make trays from leftover paper.

Organizing Fabric Scraps

Using up all those bits of leftover fabric for small projects is a great way to save them from the landfill but figuring out how to store all those pieces can be a challenge. My favorite way to store fabric is in drawers, folded to the width of the drawer and then filed as one does folders. For smaller pieces, use smaller drawers and wrap fabric around pieces of cardstock or chipboard to provide stability.


Check out these fabric storage and organization tips from around the web:
Undercover Crafter
Everything Etsy – Part One and Part Two
Sew We Quilt
Patchwork Duck
Operation: Sewing Room Organization Flickr Group
Cut to Pieces
Apartment Therapy

How do you store your fabric?

Friday Faves - April 13

 
Font: Love Potion No. 10 from My Fonts 
I'm always on the lookout for projects that will use up leftover bits of fabric. There are lots of ideas around the web. Here are a few of my favorites.

1. Business Card Holder tutorial from the Crafty Cupboard
2. Homegrown Tomato Pincushions from Martha Stewart
3. Chevron Wristlet from made by rae
4. Gathered Clutch from Noodlehead
(photos from respective sources listed above)

Here are a few more links for your inspiration:
Patchwork Kindle Case from The Sometimes Crafter 
Decorative Thumbtacks from How About Orange
Roundup of links from Everything Etsy

And Happy Friday!!

Thursday Thriftday - April 12

Purchasing games and books from the thrift store is a great way to help the planet. Reduce, Reuse, Recycle, baby! And who doesn't love a friendly game of trivia.

Patchwork Party Bag

I made this little bag using the Blue Party Bag pattern from Patchwork Style by Suzuko Koseki. The bag was made entirely with materials that I already had on hand. I was able to use small fabric scraps for the strips that make the exterior of the bag. Pieces as small as 1 inch by 6 inches are usable in this project. The bag is pieced on top of the batting by sewing strips of fabric, right sides together with the batting underneath. Once you get the hang of it, it's very easy.

My sewing machine does not have a walking foot so I was concerned that I'd have problems doing the quilting. But, it worked out just fine.

After piecing the strips, the bag is cut to the finished shape. Don't forget to add the seam allowance. It's not included in the pattern.
I've been saving this batch of red patterned fabric for a number of years and I'm so glad I was finally able to use them. I used machine embroidery thread and a combination of straight and zig-zag stitches to quilt the tops.
 The book also shows a great technique for attaching a magnetic closure.
The only change I would make is the strap. I think it would look more finished with a cord than a ribbon. The strap can be changed out fairly easily because I skipped gluing it in place. Overall I really love the bag. The colors I used are very girly but darker shades would look more sophisticated. This would be a great purse for a young girl. It's very small in size with a classic shape.

Free (Not) Printable - Happy Earth Day

An e-card is the best way to say "Happy Earth Day" so in honor of the day (April 22), I made a free non-printable.

There are a few ways to spread the Earth Day cheer.
1) Pick up the code below or in the sidebar to post the e-card to your blog
2) Click the image above, copy it and email to your friends.
3) Pin the e-card to Pinterest to share with your followers.


Happy Earth Day from Lula Louise


Friday Faves – April 6

This week's font is Century Gothic for its purported ink saving (and therefore earth-friendly) qualities.
What better way to save the planet and stay inspired than to peruse some online magazines? Here are some of my favorites.

4. Wayfare Magazine (travel magazine)

5. Rue
6. Styled
7. Peppermint
(Green fashion and lifestyle, subscription required)

Scrap Fabric Project - No Cash Wallet

I made this cute little scrap fabric wallet using the No Cash Wallet pattern from Amy Karol's Bend-The-Rules Sewing. It was a fun little project to make and a great use of scrap fabric. You'll need two long rectangles, two smaller pieces for the pockets and one long piece for the flannel facing. The flannel will help give some heft to the wallet.
The instructions are good and easy to follow but I wish that there were a few more pics of the finished wallet in action. There is a template in the back of the book for the pattern that needs to be sized up. I used a ruler and a calculator to determine the size of the pieces needed.
The button is just decorative. The wallet closes with a sew on snap. I used cotton fabric for both sides and a cotton flannel facing.
The wallet folds out with two pockets for your cards. It's a little long for my taste but I think it could be very useful. I'd love to try using it as a mini sewing kit. It would be a great place to store needles and pins for on the road crafting.
 

Scrap Fabric Project - Artsy Clutch

I made this adorable little clutch using scrap fabric and the pattern from Bend-The-Rules Sewing by Amy Karol with a few modifications. I made a fold at the bottom instead of a seam (why waist the fabric with an unnecessary seam) and skipped the flannel facing. This was a great project for using scrap fabric. The exterior fabric is a heavyweight cotton from IKEA and provides enough heft so I didn't feel that the flannel was necessary. I used the black and white fabric before for this sunhat and for some wall decor (tutorial included). The lining fabric is leftover from this refashion.
The clutch is very simple to make with just 4 rectangles stitched together. The top folds over and is held in place with a button and an elastic loop. The instructions are very clear and easy to follow.

 
Inspired by the book, I even did a little amoeba drawing on the inside flap.

The bag is the perfect size for carrying a small knitting project such as a sock. I'm really enjoying using this bag. It is such joy to look in my purse and see this beautiful little clutch.