

Showing posts with label embroidery. Show all posts
Showing posts with label embroidery. Show all posts
DIY Tutorial – Ombre Stenciled Pillowcases
DIY Horseshoe Embroidered Clutch

DIY Tutorial – St. Patrick's Day Lapel Pins

St. Patrick's Day is right around the corner and it's time to start thinking about what to wear. No one likes to get pinched but most people don't want to dress in full leprechaun regalia. To solve this I created two little DIY lapel pins for St. Patrick's Day that add just a touch of green to any outfit. They are both easy and fun to make as well as being great gifts.
DIY Tutorial – How to Sew a French Knot

The french knot is one of my favorite embroidery stitches. It's very easy to make and it looks really cool. Essentially all you do is make a knot around your needle an pull the end of the thread through the knot.
Sashiko Kit - Mini Tote Bag

I made this cute little sashiko bag using a kit that my brother and sister-in-law gave me last Christmas. I had never done this kind of embroidery before but it was a pleasant activity. I'd say fun, but come on.
The kit comes with thread and pre-printed fabric with dashed lines showing you where to stitch. (I found a kit online here.) You can choose to make either a mini tote or a half-apron. I already have a lot of aprons that I never use so I chose to make the tote.
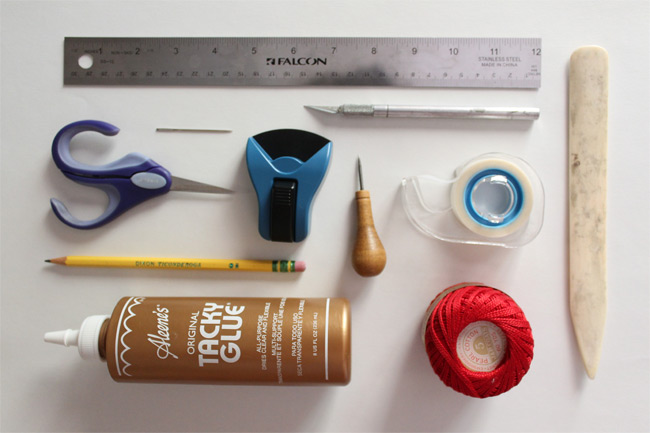
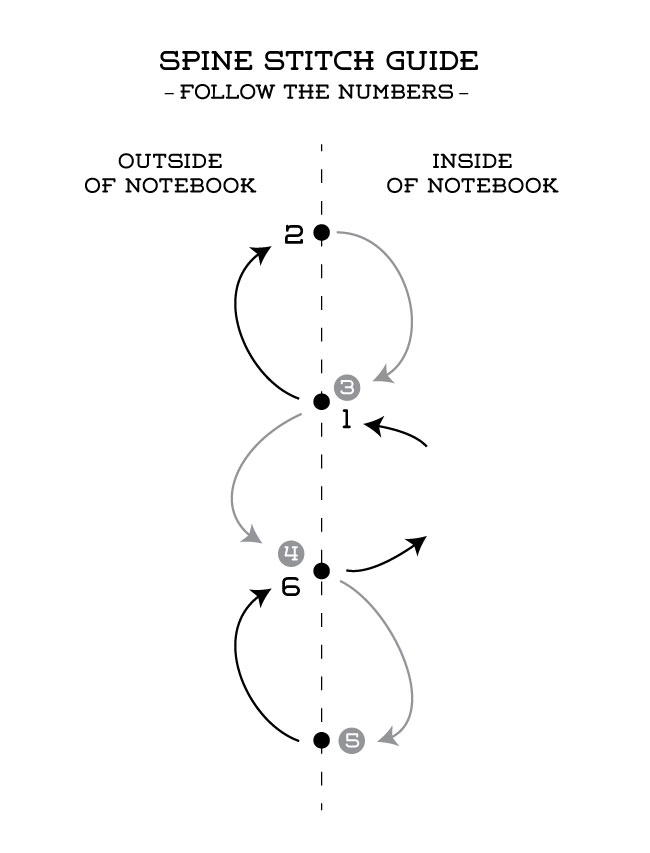
DIY Embroidered Diana Camera Notebook Tutorial


Cupcake Embroidered Reversible Shoulderbag


Step one – gather some embroidery thread and a hoop.

Step two - apply your pattern to the fabric. This cupcake pattern is from the book Sublime Stitching by Jenny Hart (see my review here). The paper on the left is the iron on pattern from the book. The right side shows the pattern after it is ironed on the fabric.
 Next, hoop your fabric and start stitching. For the hearts, I drew a rough sketch on the fabric using chalk.


An "xoxo" addition perfectly finishes the cupcake design.
 Three free-form hearts made using satin stitch, backstitch, running stitch and french knots.
 Three free-form hearts made using satin stitch, backstitch, running stitch and french knots.
The finished bag: side one – hearts embroidered on brown wool, side two – cupcake embroidered on striped cotton.
Book Review - Sublime Stitching

I've owned the book Sublime Stitching by Jenny Hart for a few years now. Check out her website for lots of embroidery goodness.) The book is a great primer for embroidery. It details all the basics from start to finish including the important beginning and ending type of advice that a regular pattern will never detail. I would recommend the book for anyone wanting to learn embroidery, as a reference material or for the many, many patterns included.


The book details the basic embroidery stitches. Just the basics, this is not an encyclopedia of stitches.

The pictures are lovely and provide great inspiration but are few.

Most of the book is iron-on patterns (sample above). The patterns are very cute with a retro feel. I've used the book once before and tomorrow will share another embroidery.

Friday Faves - Oct 28


Free Patterns and Tutorials:
Patterns from Wee Wonderfuls
All about all kinds of embroidery and How To Tutorial at The Purl Bee
Free patterns Vintage Transfer Finds
Embroidery Blogs:
Eye Candy on Flickr:
Hand Embroidery Network Group
Embroidered Shoulder Bag
 I made this bag using my Reversible Shoulder Bag pattern. (See links in the sidebar to download the pattern for free!) I had forgotten how fast this bag is to make! I enjoyed doing a project that was so fast and required no fitting. I made a couple of changes to this version. First, the embroidery which I did before sewing the pieces together. I shared the beginning of this embroidery a couple weeks ago and finished the bag last weekend. The birds are because birds are pretty and Learning Music is my brother's awesome band. Yeah, kind of geeky on my part. (Side note/shameless plug: Check out his music subscription service where you can download a new awesome album every month for the price of whatever you want to donate at LearningMusicMonthly.com. Trust me you won't regret it.)
The other change I made was to insert the bottom of the bag with the short ends centered on the side seams of the body. It's a different way to go but makes it a little more awkward to carry.
 Someone requested a copy of the pattern not tiled for printing on a large format printer so I've made a downloadable version available by clicking here. The document is 19 inches wide and 29 inches high. I'll also add a link to the sidebar.
Another side note, I've had a couple of inquiries from people asking if they can use the pattern I created to make bags for sale. While I do provide the pattern for free download and personal use, I don't authorize it's use for profit. This is standard protocol for patterns and copyright. An exception is the fabulous BurdaStyle.com which allows the use of their patterns for profit. Their patterns are open source and copyright free (explanation here). If you need a pattern for bags to make for sale, check out these BurdaStyle patterns: the Diana, the Charlie.
The alternative is to create your own patterns. You are welcome to use my pattern as inspiration, and make changes to create your own design. It's really hard to say no to requests, but I don't feel comfortable authorizing unlimited use of my pattern for others profit. Making patterns can take some practice and always takes multiple tries to get right. The more sewing you do, the easier it will be to create your own patterns. Just don't be afraid. Give it a try and embrace your own creativity.
Please continue to download the pattern and make the Reversible Shoulderbag for personal use. I love to hear from you and I love to see photos too. You can upload photos to the Flickr group too.
Finished Vintage Crewel
Finished. Done. Yippee!
 I put the finishing touches on this vintage crewel piece over the weekend. I became a little obsessive in my quest to get it done. (You know, staying up way too late just to get closer to done even though it's less fun than it used to be?) Now I'll just need to figure out what to do with it...
Vintage Crewel
 I was doing some spring cleaning today. Going through my hall closets, trying to get my crafting supplies under control, I found this partially finished piece of crewel work. The pattern says it is a Bernat Stitchery Pak, Petals Pillow No. SO 8057.
 When the crewel embroidery is finished, it can be made in to a pillow. The color scheme (orange rust and avocado green) makes me think it's probably from the 1970s. It's mostly done except for the center flower and a few smaller leaves and flowers. From the handwriting on one of the bundles of yarn, I think it belonged to my grandma.
 I haven't done much crewel work, although I do have a couple of books about the subject. The impulse overtook me and I sat right down to work on this long ago abandoned piece. I completed the two golden colored flowers. Made with bunches of french knots, they look like fuzzy mums. I never know what to do with embroidery. I used to cross stitch when I was younger. Even about 5 years ago a made a cross stitch sampler of fruits and vegetables. It's pretty large, maybe 12 inches by 18 inches. I enjoyed making it but had no idea what to do with it so it just sat around. My family often does a white elephant gift exchange. I figured that was the perfect place to get rid of my embroidery. I had a frame from a mirror that had broken. So I matted the sampler and framed it. My brother won the sampler but it ended up hanging in my parents dining room. They've moved now so I don't know where that sampler will end up next.
Anyway, what should I do with this crewel work? It's so close to being done that I think I'll finish it. I might put it in a shadow box I have and hang it up. I don't want it to look hokey though. I'm imagining a little bird figure sitting on the flowers in the shadow box frame. Is that too silly? We'll see.
Subscribe to:
Posts (Atom)